DESCRIPTION INTERFACE
 1.1
1.1
1
Toggle enable or disable plugin.
2
Save settings button.
3
Description.
 1.2
1.2
1
Go to the element selection menu.
2
Add form to element.
 2.1
2.1
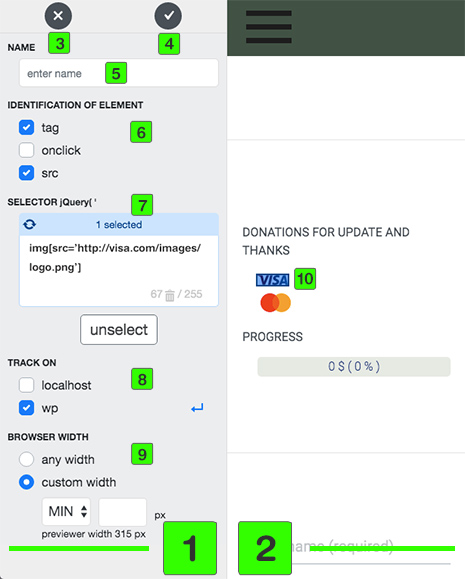
1PANEL.
2PREVIEWER.
3Go back to settings page.
4Save settings button.
5Name for element. Optional setting.
6
Add or remove identification items for more correct results.
7
Selector (jQuery) of the selected element (10).
8
Selection of pages on which the element will be monitored.
9
Choose browser width at which to fix click.
10
Selected element. To select an element, hover over and click.
 3.1
3.1
1
Delete form.
2
Toggle pause or tracking.
3
Toggle show or hide settings.
4
Toggle show or hide charts.
 3.2
3.2
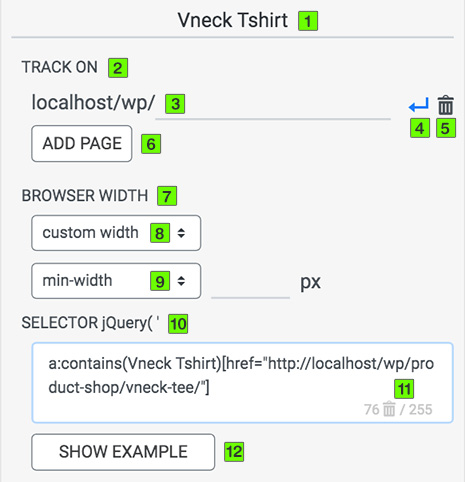
1
Name for element. Optional setting.
2
Tracking settings.
3
Address page on which to monitor element.
4
Button allows you to add all subdirectories to the list of monitored.
5
Remove page from list.
6
Add page to tracking list.
7
Choose browser width at which to fix click.
8
Any width - fixation at any width.
Custom width - you can specify the width of the browser window.
9
min width - browser window width not less than specified.
max width - browser window width no more than specified.
10
Selector (jQuery) needed for element identification.
11
The number of characters of the selector and the maximum number of characters. Trash can icon used to clear selector.
12
Show or hide auxiliary table.
 3.3
3.3
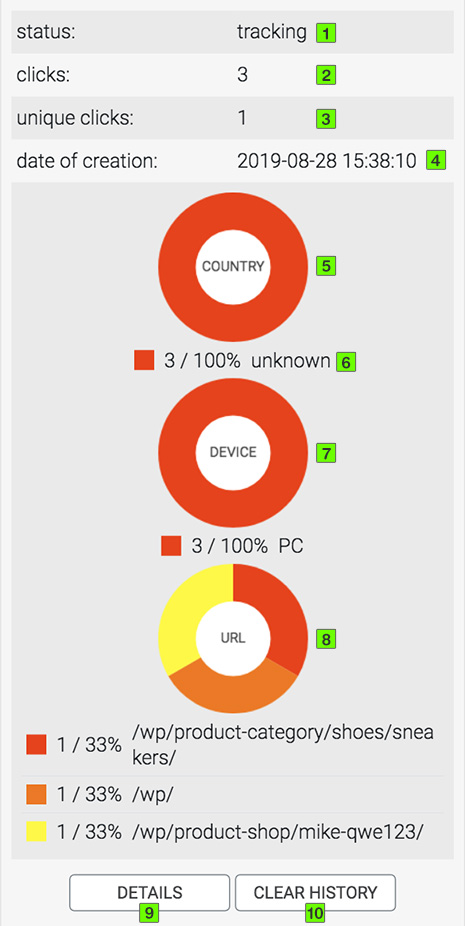
1
Status tracked or paused. Switches see image 3.1 [ 2 ].
2
Total clicks.
3
Number of clicks of users with different IP.
4
Element creation date.
5
Ring chart for visitor countries.
6
Legend for a pie chart - color on the chart, quantity, percentage, country.
7
Ring chart for visitor device.
8
Ring chart for pages click event.
9
Switch show or hide statistics details table.
10
Clear statistics history.
To start tracking element statistics, use the "SELECT ELEMENT" button or the "PRINT ELEMENT" button.
If selected "SELECT ELEMENT". Hover over the desired element in PREVIEWER (section b. Image 2.1, item 2) to confirm the selection, leave the mouse cursor on the element (2.5 sec) and confirm the selection with the "YES" button.
An element needs to be observed only on certain pages, use the "TRACK ON" menu (section b. Image 2.1, item 8).
You need to refine an element, use the optional jQuery selectors.
You need to track an element only on devices with a certain width, use the "BROWSER WIDTH" menu.
If the item is added by "PRINT ELEMENT". Enter the jQuery selector in the text box.
If an element needs to be observed only on certain pages, use the “TRACK ON” menu.
If you need to track an element only on devices with a certain width, use the "BROWSER WIDTH" menu.